In our previous posts, we introduced you to Google Analytics 4 (GA4), how it’s different from Universal Analytics (UA or GA, and the current version of Google Analytics), and how to set it up to run alongside your current analytics platform.
Unfortunately, just because GA4 is installed on your website doesn’t mean there’s nothing else to do. If you were tracking goal completions in UA, you will now need to set up conversion tracking for your new GA 4 properties.
Before we get started, a quick vocabulary lesson for those of you transitioning from UA is in order. Google Goals are a thing of the past and are being replaced by Conversions. This is a welcome change, because almost every other marketing platform is already calling the completion of activities you want to track “Conversions” rather than “Goals.”
Setting up Conversions in GA4 is just as complicated as setting up Goal Completions in GA – so don’t believe all those other blog posts that say setting up GA4 is “easy.” The good news is that we’ve figured out the specifics for you and have put together step-by-step instructions (as well as warnings about where things could go wrong and get frustrating).
Events: The Foundation of Conversions
Like UA, GA4 uses Events to track user behavior. Events are fed to GA4 by third-party applications, Google Tag Manager (GTM), or custom code written by developers. We’re going to show you how to use Google Tag Manager since it’s the tool most commonly used by marketers to alert Google Analytics that a particular activity has occurred. An example of an activity you might want to track is when a visitor clicks a button to submit a contact form.
Google Analytics 4 records many events automatically, including when someone clicks a link or visits a page. Unfortunately, GA4 doesn’t track when visitors click buttons, so if you have a contact form that doesn’t direct to a separate landing page, you need to create an event to track your submit button clicks. We’ll show you how to do this using Google Tag Manager. If you don’t have Google Tag Manager installed, you’ll need to set it up first. If you do have GTM installed, log in and access the Overview screen of your Workspace to begin.
Configuring Events in Google Tag Manager
1. Set up the Google Analytics 4 Tag Configuration
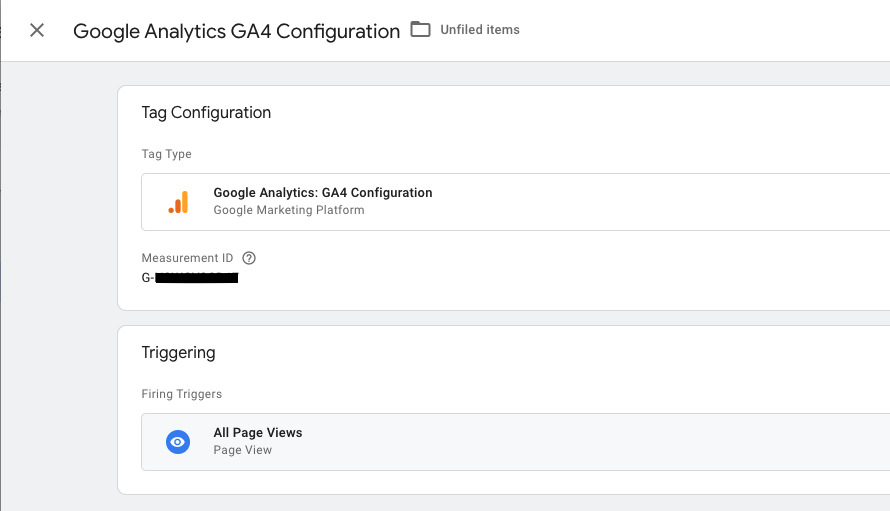
First, you need to set up your Tag Configuration. This will set up Google Analytics 4 to track your data, including setting cookies and enabling your events to be tracked.
- Click ”Tags” then “New”
- Click ”Tag Configuration”
- Choose ”Google Analytics: GA4 Configuration”
- Enter your Measurement ID
To find your Measurement ID, login into GA4, click “Admin”, and choose “Data Streams” from the property column. Click on the Data Stream that corresponds to your website. If you don’t see it, there may be a problem with Google Analytics 4 installation. You’ll need to properly install GA4 before proceeding.
- Click “Save”
Next Click “Add Trigger”. If you previously set up events in Google Tag Manager, you probably already have a trigger that fires for “All Pages”. If so, select it. If not, create it as follows:
- Click “Add Trigger”
- Name Your Trigger
- Click the Circle Icon
- Choose “Page View”
- Click “Save”
Any tag that is assigned this trigger will run every time someone views a new page.
2. Set Up Your Event
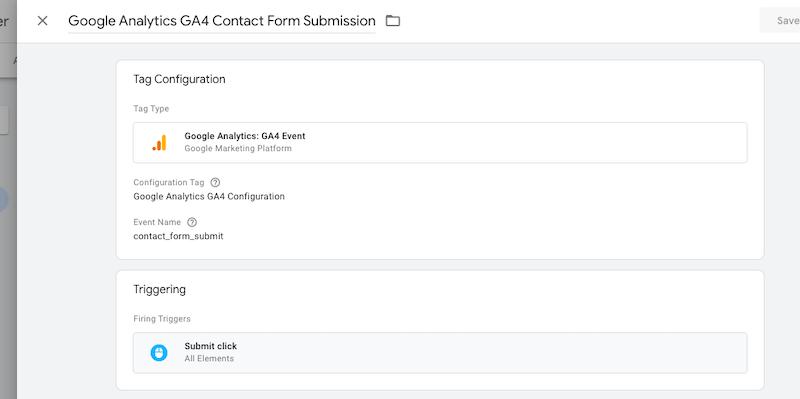
Now that we’ve configured GTM to send data to GA4, we need to create the tag that will register when a user clicks the Submit button.
- From “Tags”, click “New”
- Name Your Tag
- Click the Gray Button in the center of the screen
- Select “Google Analytics: GA4 Event”
- Under the “Configuration” Tag, select the Configuration Tag you just created
- Name your Event, for example “contact_form_submit”
- Next Click “Add Trigger”
If you previously set up events in Google Tag Manager, you probably already have a trigger tracking your contact form submission. If so, select it. If not, create it as follows:
- Click “Add Trigger”
- Name Your Trigger
- Click the Circle Icon
- Choose “Click – All Elements”
- Choose “Some Clicks” under “This trigger fires on”
You’ll need to find a way to uniquely identify the specific button you want to track. In this example, “Click ID” equals “form-submit”. Enter all the conditions that need to be true for the trigger to fire. If you need help understanding the properties of your button, click here for help.
- Click “Save”
- Click “Submit”
- Click “Publish”
- Click “Continue”
Creating Events in Google Analytics 4
Now that an event is sent to Google Analytics 4 whenever someone submits a contact form, we need to capture it in GA4 using a Custom Event.
Before a Custom Event can be created, you first need to create a Custom Dimension which allows it to be used in reporting:
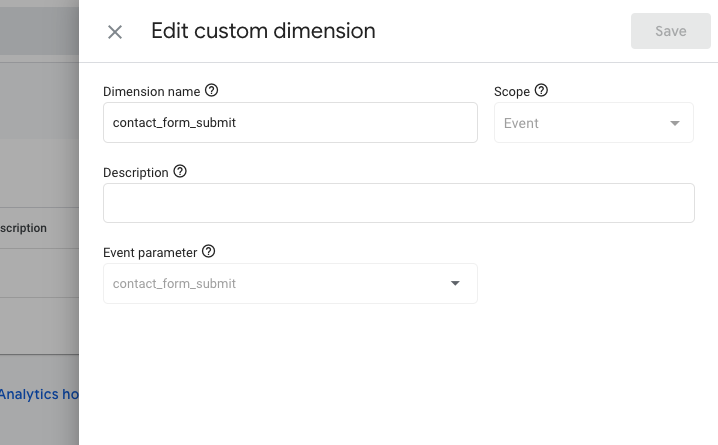
Create a Custom Dimension
- Click “Configure” on the lefthand menu
- Select “Custom Definitions”
- Click “Create Custom Dimensions”
- Choose a Dimension Name to be used in the reports. For example, we used “contact_form_submit” to be consistent with the Event Name we’re sending
- Under “Event Parameter” select the Event you want to track
- Click “Save”
Create a Custom Event
Are you still with me? The good news is we are almost done!
Even though you can see that Google is currently recording the event, there is an extra step needed to register the event so it can track conversions.
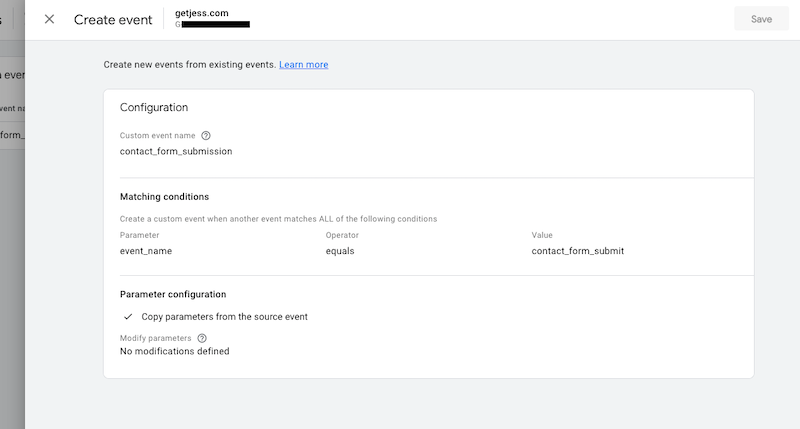
- Click “Create Event”
- Click “Create”
- Enter the name of your event in the Custom Event field
- Under “Matching Conditions”, enter “event_name” under “Parameter”
- Choose “Equals” under the “Operator” menu
- Set the Value to “contact_form_submit” (or whatever Event Name you used in GTM)
- Check “Copy Parameters from the Source Event”
- Click “Save”
Please Note: Even though you may confirm that your events are firing by clicking “Realtime”, it often takes up to 24 hours for new events to appear under “All Events”.
Setting Up Conversions
Once your event appears, click the toggle under “Mark as Conversion” to complete setting up conversion tracking for your contact form.
If you don’t want to wait a day for your event to appear under “All Events” or you’re worried that you’ll forget to select “Mark the Conversion”, you can manually create a new conversion:
- Click the Conversion
- Click “New Conversion Event”
- Enter the name of the event you created, for example “contact_form_submit” (or whatever event name you created)
- Click ”Save”
Don’t forget to test your conversion setup. If you fill out a contact form, you should see your conversion and event under “Realtime”.
Questions? Just enter a comment below and we’ll try to help.
We’ll be creating more GA4 tutorials, including one on how to use the new “Debug” view to complete your testing. To automatically receive these updates, sign up for our newsletter.


0 Comments