In October 2020, Google launched a new version of their popular analytics tool. Designed to ultimately replace Universal Analytics (UA), their legacy product, the new Google Analytics 4 (GA4) is now the default system when you create a new Google Analytics account. For existing UA users, Google recommends that they keep using that product alongside GA4 until this new product is fully developed.
So how do you set up Google Analytics 4 if you’re an existing user of Universal Analytics? In the following article, we’ll show you all the steps and actions you need to take to successfully set up a new GA4 account so you can be on your way to using and learning from this new tool.
Step #1: Create a Property
The first thing you need to do is visit your Google Analytics account. At the bottom corner of your GA dashboard, click “Admin.”
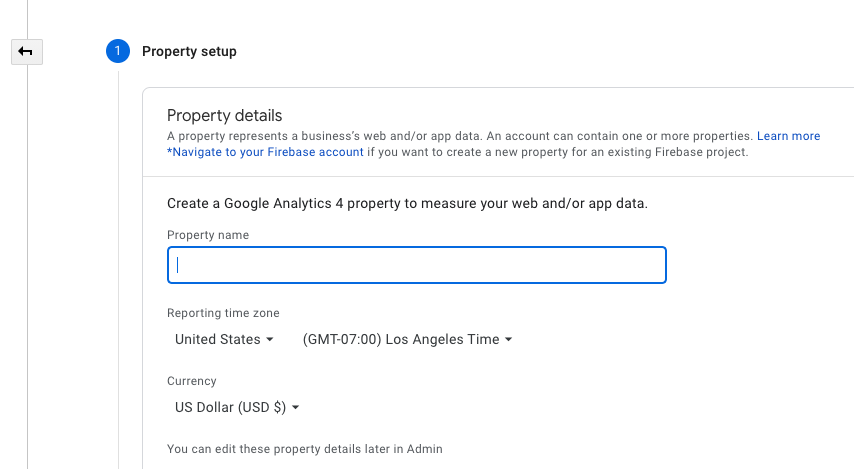
When the next screen opens, click “Create Property” at the very top of the second column in the middle of the page. A property represents your business website data, so you’ll want to enter the name of your business website in the “Property Name” field. Then you’ll select the time zone where your business is located and the currency type that is accepted if you’re operating an e-commerce website. After you complete these actions, click “Next” to proceed to the next step.
In the next screen, Google needs to collect the specifics of your business. Providing this info to Google Analytics helps the product tailor its performance to meet your specific needs to provide more appropriate data and produce accurate reports.
First, choose an “Industry Category” from the drop-down menu (ex. “Business and Industrial”), then select the “Business Size” (ranging from “Small 1-10” to “Very Large 500+ employees”) that best reflects your company.
In the next portion of the process, define how your company intends to use GA4. A list of various purposes is provided, so select any that apply to your analytics needs. For instance, if you intend to use GA4 to measure lead generation and customer engagement, be sure to choose both of those options. If the purpose is not provided in the list, select the “Other” option.
After you’ve provided your business information and explained how you intend to use GA4, click the “Create” button. You’ll immediately be prompted to accept Google’s Terms of Service Agreement which you will need to do before you can continue to the next step and complete the GA4 set up.
Step #2: Web Stream Details
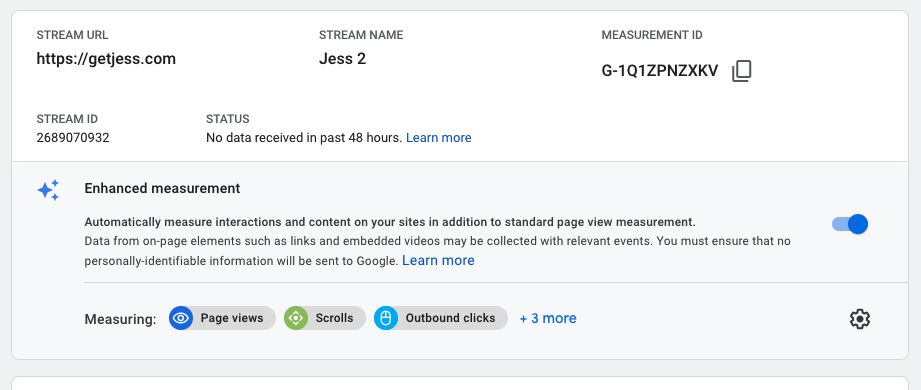
Once you accept the TOS agreement, a new window opens and you’ll be asked to set up a data stream. Select Web, and the Web Stream Details page will open. Here, you’ll confirm the Stream URL and Stream Name for your website. Go ahead and leave the Enhanced Measurement button selected. Click “Create Stream.”
TIP: copy the “Measurement ID” at the top of this page. You’ll need that later in the next part of the set-up process.
Step #3: Linking UA & GA
Since you want to draw information from your website to both the UA and GA4 products, you’ll need to connect them. Connecting UA and GA4 produces one single piece of code that you can place on your website to send data to both analytics tools. Google allows you to do this in the next section.
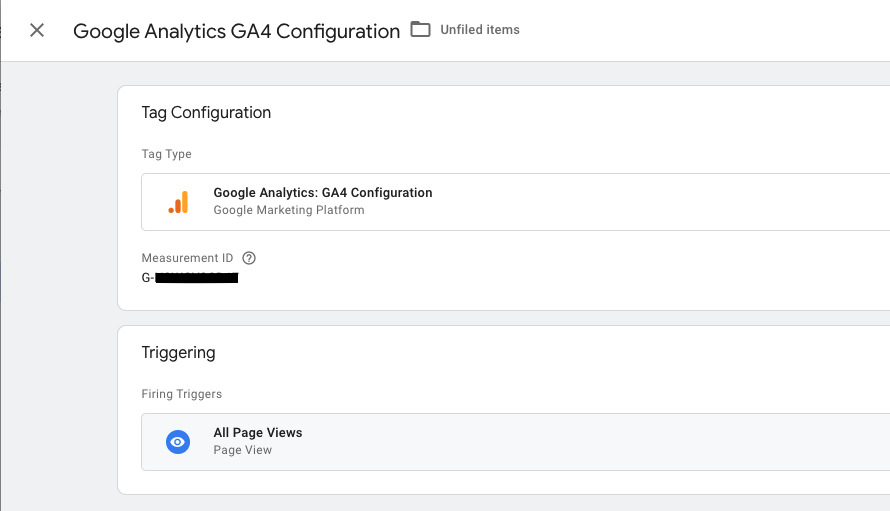
Scroll down to the “Tagging Instructions” portion of the page and select the “Use existing on-page tag” tab. Then choose “Google Tag Manager.” Choosing this option displays the next set of directions you’ll need to complete the next part of the set-up process:
- Open the Google Tag Manager container that’s implemented on your page.
- Click Tags > New.
- Click Tag Configuration and select GA4 Configuration.
- Enter the Measurement ID
- Select to trigger the tag on All Pages
Next, you’ll name your Tag (ex. “GA4 Configuration”) so you can easily recognize it, then click the “Save” button.
Step #4: Make it Live
Now it’s time to make GA4 live on your site. From the Tag Manager, click the “Submit” button then add a version name and description if desired to easily recognize and distinguish this from any previous versions. When that is completed, click the “Publish” button to make GA4 live on your website!
Step #5: Confirm and View
To ensure that GA4 was correctly installed on your site and is sending data to your account, select the new GA4 property in Google Analytics. View the “Real-Time” report to confirm that GA4 is operational and sending new data to your account.
There you have it! Five easy-to-follow steps to help you successfully install Google Analytics 4 on your website. If you’d like to learn more about GA4 and other important SEO information and trends be sure to subscribe to our newsletter.


0 Comments